作者:Adam Freeman
翻译:陈广
日期:2018-10-31
本章我通过向您展示 ASP.NET Core Identity 所提供的一些高级特性来完成对 ASP.NET Core Identity 的描述。我演示如何通过在用户类上定义自定义属性来扩展数据库架构,以及如何使用数据库迁移来应用这些属性而不删除 ASP.NET Core Identity 数据库中的数据。我还解释了 ASP.NET Core Identity 如何支持 claims 的概念,并演示了如何使用它们灵活地授权通过策略访问 action 方法。在结束本章时,我将向您展示 ASP.NET Core Identity 如何使通过第三方对用户进行身份验证变得容易。我演示了使用 Google 帐户进行身份验证,但 ASP.NET Core Identity 也内置了对 Microsoft、Facebook 和 Twitter 帐户的支持。表30-1为本章摘要。
表 30-1:本章摘要
| 问题 | 解决方案 | 清单 |
|---|---|---|
| 为用户存储自定义数据 | 向用户类添加属性并更新 Identity 数据库 | 1-3 |
| 执行粒度授权 | 使用 claims | 4-7 |
| 创建自定义 claims | 使用 claims 转换 | 8,9 |
| 使用 claims 数据评估用户访问权限 | 创建策略 | 10-14 |
| 使用策略访问资源 | 在 action 方法内评估策略 | 15-20 |
| 允许第三方执行身份验证 | 接受 Microsoft、Google 和 Facebook 等认证提供商的 claims |
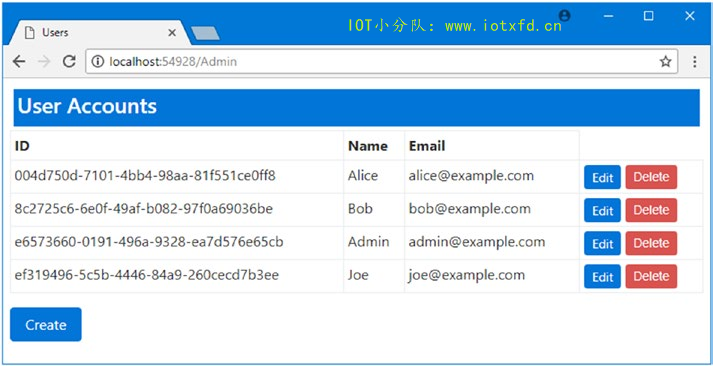
本章我将继续研究在第28章中创建并在第29章中增强的 Users 项目。启动应用程序并确保数据库中有用户。图30-1显示了数据库的状态,它包含上一章中的用户Admin、Alice、Bob 和 Joe。要检查用户,请启动应用程序,请求 /Admin URL,并使用电子邮件地址 admin@example.com 和密码 secret 作为管理用户进行身份验证。
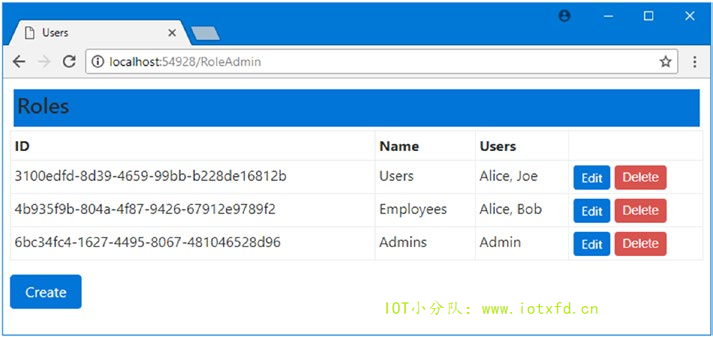
本章还需要一些角色。导航至 /RoleAdmin URL,创建名为 Users 和 Employees 的角色,并将 Users 赋给这些角色,如表30-2所示。
表 30-2:示例应用程序所需要角色和成员
| 角色 | 成员 |
|---|---|
| Users | Alice, Joe |
| Employees | Alice, Bob |
图30-2显示了 RoleAdmin 控制器所需的角色配置。
当我在第28章中创建AppUser类来表示用户时,解释了基类定义了一组描述用户的基本属性,比如电子邮件地址和电话号码。
大多数应用程序需要存储更多关于用户的信息,包括持久的应用程序首选项和地址等详细信息 —— 简而言之,任何对运行应用程序有用的数据都应该在会话之间持续。由于 ASP.NET Core Identity 系统默认使用 Entity Framework Core 来存储其数据,因此定义其他用户信息意味着向用户类添加属性,并让 EF Core 创建存储这些属性所需的数据库架构。
清单30-1显示了如何向AppUser类添加两个简单属性,以表示用户居住的城市及其资格级别。
清单 30-1:Models 文件夹下的 AppUser.cs 文件,添加属性
using Microsoft.AspNetCore.Identity;

namespace Users.Models
{
    public enum Cities
    {
        None, London, Paris, Chicago
    }
    public enum QualificationLevels
    {
        None, Basic, Advanced
    }
    public class AppUser : IdentityUser
    {
        public Cities City { get; set; }
        public QualificationLevels Qualifications { get; set; }
    }
}
称为Cities和QualificationLevels的枚举定义了一些城市的值和不同级别的资格。这些枚举被添加到AppUser类的City和Qualification属性使用。
清单30-2中添加到 Home 控制器的 actions 允许用户查看和编辑他们的City和Qualification属性。
清单 30-2:Controllers 文件夹下的 HomeController.cs 文件,为自定义属性添加支持
using System.Collections.Generic;
using Microsoft.AspNetCore.Mvc;
using Microsoft.AspNetCore.Authorization;
using Users.Models;
using Microsoft.AspNetCore.Identity;
using System.Threading.Tasks;
using System.ComponentModel.DataAnnotations;

namespace Users.Controllers
{
    public class HomeController : Controller
    {
        private UserManager<AppUser> userManager;
        public HomeController(UserManager<AppUser> userMgr)
        {
            userManager = userMgr;
        }

        [Authorize]
        public IActionResult Index() => View(GetData(nameof(Index)));

        [Authorize(Roles = "Users")]
        public IActionResult OtherAction() => View("Index",
            GetData(nameof(OtherAction)));

        private Dictionary<string, object> GetData(string actionName) =>
            new Dictionary<string, object>
            {
                ["Action"] = actionName,
                ["User"] = HttpContext.User.Identity.Name,
                ["Authenticated"] = HttpContext.User.Identity.IsAuthenticated,
                ["Auth Type"] = HttpContext.User.Identity.AuthenticationType,
                ["In Users Role"] = HttpContext.User.IsInRole("Users"),
                ["City"] = CurrentUser.Result.City,
                ["Qualification"] = CurrentUser.Result.Qualifications
            };

        [Authorize]
        public async Task<IActionResult> UserProps()
        {
            return View(await CurrentUser);
        }

        [Authorize]
        [HttpPost]
        public async Task<IActionResult> UserProps(
            [Required]Cities city,
            [Required]QualificationLevels qualifications)
        {
            if (ModelState.IsValid)
            {
                AppUser user = await CurrentUser;
                user.City = city;
                user.Qualifications = qualifications;
                await userManager.UpdateAsync(user);
                return RedirectToAction("Index");
            }
            return View(await CurrentUser);
        }
        private Task<AppUser> CurrentUser =>
            userManager.FindByNameAsync(HttpContext.User.Identity.Name);
    }
}
新的CurrentUser属性使用UserManager<AppUser>类检索AppUser实例来表示当前用户。在UserProps action 方法的 GET 版本中,AppUser对象用作视图模型对象,POST 方法使用它更新City和QualificationLevel属性的值。
GetData方法已经更新,因此它返回的字典包含当前用户的自定义属性值,这意味着这些属性值将在Index和OtherAction action 方法显示的视图中看到。
为了向UserProps action 方法提供一个视图,我在 Views/Home 文件夹中添加了一个名为 UserProps.cshtml 的视图,并添加了清单30-3所示的标记。
清单 30-3:Views/Home 文件夹下的 UserProps.cshtml文件的内容
@model AppUser

<div class="bg-primary m-1 p-1 text-white"><h4>@Model.UserName</h4></div>

<div asp-validation-summary="All" class="text-danger"></div>

<form asp-action="UserProps" method="post">
    <div class="form-group">
        <label asp-for="City"></label>
        <select asp-for="City" class="form-control"
                asp-items="@new SelectList(Enum.GetNames(typeof(Cities)))">
            <option disabled selected value="">Select a City</option>
        </select>
    </div>
    <div class="form-group">
        <label asp-for="Qualifications"></label>
        <select asp-for="Qualifications" class="form-control"
                asp-items="@new SelectList(Enum.GetNames(typeof(QualificationLevels)))">
            <option disabled selected value="">Select a City</option>
        </select>
    </div>

    <button type="submit" class="btn btn-primary">Submit</button>
    <a asp-action="Index" class="btn btn-secondary">Cancel</a>
</form>
视图包含一个带有select元素的表单,这些元素由清单30-1中定义的枚举值填充。提交表单时,从 Identity 中检索表示当前用户的AppUser对象,并使用用户选择的值更新自定义属性值,如下所示:
...
AppUser user = await CurrentUser;
user.City = city;
user.Qualifications = qualifications;
await userManager.UpdateAsync(user);
return RedirectToAction("Index");
...
注意,我必须显式地告诉用户管理器更新数据库记录,以便用户通过调用UpdateAsync方法来反映更改。以前不必这样做,因为在用于更改 Identity 的方法中为我调用了UpdateAsync方法,但是当您直接更改属性时,您负责告诉用户管理器执行更新。
支持新属性的所有应用程序装置都已经就绪,剩下的就是更新数据库,以便其表存储自定义属性值。
Entity Framework Core 没有对使用种子数据的集成支持,在创建迁移以禁用种子时必须小心,如清单30-4所示;否则,清单30-1中添加到模型类中的新属性将导致错误。一旦创建和应用了数据库迁移,就可以再次启用种子语句。
清单 30-4:Users 文件夹下的 Startup.cs 文件,禁用数据库种子
...
public void Configure(IApplicationBuilder app, IHostingEnvironment env)
{
    app.UseStatusCodePages();
    app.UseDeveloperExceptionPage();
    app.UseStaticFiles();
    app.UseAuthentication();
    app.UseMvcWithDefaultRoute();
    //AppIdentityDbContext.CreateAdminAccount(app.ApplicationServices,
    //    Configuration).Wait();
}
...
在禁用种子之后,下一步是创建一个新的数据库迁移,该迁移将包含更新数据库架构所需的 SQL 命令。使用命令提示符或 PowerShell 窗口在 Users 项目文件夹中运行以下命令:
dotnet ef migrations add CustomProperties
译者注:如果之前使用【Ctrl + F5】运行过程序,使用此命令会失败,因为 IIS 正在运行此应用程序。此时在任务栏找到 IIS 图标并右键关闭即可。
当此命令完成后,您将在 Migrations 文件夹中看到一个新文件,该文件的名称包含 CustomProperties。确切的名称包含一个数字 ID,但是如果打开这个文件,可以看到一个 C# 类,它包含一个名为Up的方法,执行向数据库添加对自定义属性的支持所需的 SQL 命令。还有一个名为Down的方法,它执行命令将数据库降级为以前的模式。
下一步是将数据库迁移到新架构,这是通过运行以下命令来完成的:
dotnet ef database update
命令完成后,存储用户数据的数据库中的表将包含表示自定义属性的新列。
警告:在包含实际用户数据的生产数据库上执行数据库迁移时要小心。很容易创建一个删除列或整个表的迁移,这可能会产生破坏性的影响。确保彻底测试数据库迁移的效果,并确保备份了关键数据,以防出错。
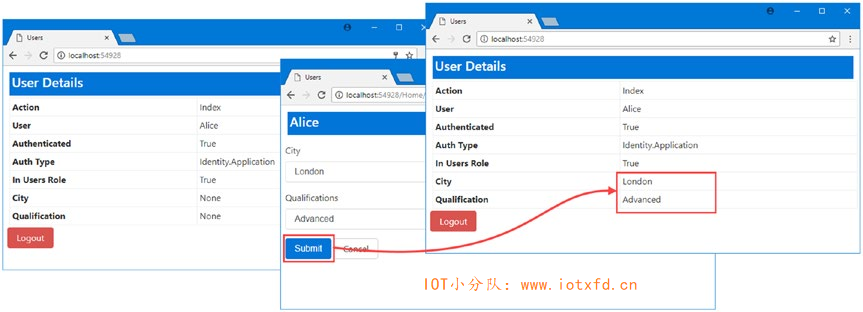
要测试迁移的效果,启动应用程序并作为 Identity 用户之一进行身份验证(例如,使用电子邮件 alice@example.com 和密码 secret123)。一旦通过身份验证,您将看到City和QualificationLevel属性的默认值。可以通过请求 /Home/UserProps URL,选择新值并单击【Submit】按钮来更改属性,该按钮将更新数据库并将浏览器重定向回 /Home URL,后者将显示新值,如图30-3所示。
在较旧的用户管理系统中,例如 ASP.NET Membership(ASP.NET Core Identity 的前身),该应用程序被认为是用户所有信息的权威来源,本质上将应用程序视为一个封闭的世界,并信任其中包含的数据。
这是一种根深蒂固的软件开发方法,很难识别正在发生的事情,但在第29章中,您看到了封闭世界技术的一个例子,当时我根据存储在数据库中的凭据对用户进行身份验证,并根据与这些凭据相关的角色授予访问权限。当向用户类添加属性时,我在本章中再次做了同样的事情。管理用户身份验证和授权所需的每一条信息都来自我的应用程序 —— 对于许多 web 应用程序来说,这是一种非常令人满意的方法,这就是为什么我如此深入地演示了这些技术的原因。
ASP.NET Core Identity 还支持一种处理用户的替代方法,如果 MVC 应用程序不是用户的唯一信息来源,并且可以用比传统角色允许的更灵活和更优雅的方式授权用户,这种方法工作得很好。这种替代方法使用 claims,在本节中,我将描述 ASP.NET Core Identity 如何支持基于 claims 的授权。
提示:您不必在应用程序中使用 claims,正如第29章所示,ASP.NET Core Identity 非常乐意为应用程序提供身份验证和授权服务,而不需要完全理解 claims。
声明是关于用户的一段信息,以及关于这些信息来自何处的一些信息。了解 claims 的最简单方法是通过一些实际的演示,没有这些演示,任何讨论都变得过于抽象,无法真正发挥作用。为了开始工作,我在 Controllers 文件夹中添加了一个名为 ClaimsController.cs 类文件,并使用它来定义如清单30-5所示的控制器。
提示:当我定义代码并描述这个示例的类时,您可能会感到有些迷茫。暂时不要担心细节 —— 只要坚持到你看到我定义的 action 方法和视图的输出为止。最重要的是,这将有助于正确看待 claims 要求。
清单 30-5:Controllers 文件夹下的 ClaimsController.cs 文件的内容
using Microsoft.AspNetCore.Authorization;
using Microsoft.AspNetCore.Mvc;

namespace Users.Controllers
{
    public class ClaimsController : Controller
    {
        [Authorize]
        public ViewResult Index() => View(User?.Claims);
    }
}
您可以不同的方式获取与用户关联的 claims。User属性(也可以作为HttpContext.User属性使用)返回一个ClaimsPrincipal对象,这是我在本例中使用的方法。与用户相关的 claims 集通过表30-3中描述的ClaimsPrincipal方法和属性进行访问。
表 30-3:ClaimsPrincipal 类的选定成员
| 名称 | 描述 |
|---|---|
Identity |
获取与当前用户关联的IIdentity值,如下一小节所述。 |
FindAll(type)FindAll(<predicate>) |
这些方法返回特定类型或由 predicate 匹配的所有 claims。 |
FindFirst(type)FindFirst(<predicate>) |
这些方法返回特定类型或由 predicate 匹配的第一个 claim。 |
HasClaim(type, value)HasClaim(<predicate>) |
如果用户拥有具有指定值的指定类型的 claim,或者有一个由 predicate 匹配的 claim,这些方法将返回true。 |
IsInRole(name) |
如果用户是具有指定名称的角色的成员,则返回true。 |
正如我在第28章中解释的那样,HttpContext.User.Identity属性返回IIdentity接口的实现,它在使用 ASP.NET Core Identity 时是一个ClaimsIdentity对象,表30-4显示了它定义的与本章相关的成员。
表 30-4:ClaimsIdentity 类定义的选定成员
| 名称 | 描述 |
|---|---|
| Claims | 返回代表用户 claims 的Claim对象枚举 |
| AddClaim(claim) | 向用户 identity 添加一个claim |
| AddClaims(claims) | 向用户 identity 添加添加一个Claim对象枚举 |
| HasClaim(predicate) | 如果用户 identity 包含与指定 predicate 匹配的声明,则返回true。 |
| RemoveClaim(claim) | 从用户 identity 移除一个 claim |
其他方法和属性是可用的,但表中的方法和属性是 web 应用程序中最常用的方法和属性,原因将在我演示如何在更广泛的 ASP.NET Core 平台中使用 claim 时变得显而易见。
在清单30-5中,我使用Controller.User属性来获得一个ClaimsPrincipal对象,并将Claims属性的值作为默认视图的视图模型传递。Claim对象表示关于用户的单个数据,Claim类定义了表30-5中所示的属性。
表 30-5:Claim 类定义的属性
| 名称 | 描述 |
|---|---|
| Issuer | 返回提供 claim 的系统的名称 |
| Subject | 返回 claim 引用的用户的ClaimsIdentity对象 |
| Type | 返回 claim 所表示的信息的类型 |
| Value | 返回 claim 所表示的部分信息 |
为了显示与用户相关的 claims 的细节,我创建了 Views/Claims 文件夹,在其中创建了一个名为 Index.cshtml 的文件,并添加了清单30-6所示的标记。
清单 30-6:Views/Claims 文件夹下的 Index.cshtml 文件的内容
@model IEnumerable<System.Security.Claims.Claim>

<div class="bg-primary m-1 p-1 text-white"><h4>Claims</h4></div>

<table class="table table-sm table-bordered">
    <tr>
        <th>Subject</th>
        <th>Issuer</th>
        <th>Type</th>
        <th>Value</th>
    </tr>
    @if (Model == null || Model.Count() == 0)
    {
        <tr><td colspan="4" class="text-center">No Claims</td></tr>
    }
    else
    {
        @foreach (var claim in Model.OrderBy(x => x.Type))
        {
            <tr>
                <td>@claim.Subject.Name</td>
                <td>@claim.Issuer</td>
                <td identity-claim-type="@claim.Type"></td>
                <td>@claim.Value</td>
            </tr>
        }
    }
</table>
视图使用一个表来显示视图模型中提供的每个 claims。Claim.Type属性的值是 Microsoft 架构的 URI,它并不特别有用。流行的架构被用作System.Security.Claims.ClaimTypes类中字段的值,因此为了使 Index.cshtml 视图的输出更容易阅读,我向td元素添加了一个自定义属性,该元素显示Type属性如下:
...
<td identity-claim-type="@claim.Type"></td>
...
我向 Infrastructure 文件夹中添加了一个名为 ClaimTypeTagHelper.cs 的类文件,并使用它创建了一个标签助手,它将属性值转换为一个更易读的字符串,如清单30-7所示。
清单 30-7:Infrastructure 文件夹下的 ClaimTypeTagHelper.cs 文件的内容
using System.Linq;
using System.Reflection;
using System.Security.Claims;
using Microsoft.AspNetCore.Razor.TagHelpers;

namespace Users.Infrastructure
{
    [HtmlTargetElement("td", Attributes = "identity-claim-type")]
    public class ClaimTypeTagHelper : TagHelper
    {
        [HtmlAttributeName("identity-claim-type")]
        public string ClaimType { get; set; }

        public override void Process(TagHelperContext context,
            TagHelperOutput output)
        {
            bool foundType = false;
            FieldInfo[] fields = typeof(ClaimTypes).GetFields();
            foreach (FieldInfo field in fields)
            {
                if (field.GetValue(null).ToString() == ClaimType)
                {
                    output.Content.SetContent(field.Name);
                    foundType = true;
                }
            }
            if (!foundType)
            {
                output.Content.SetContent(ClaimType.Split('/', '.').Last());
            }
        }
    }
}
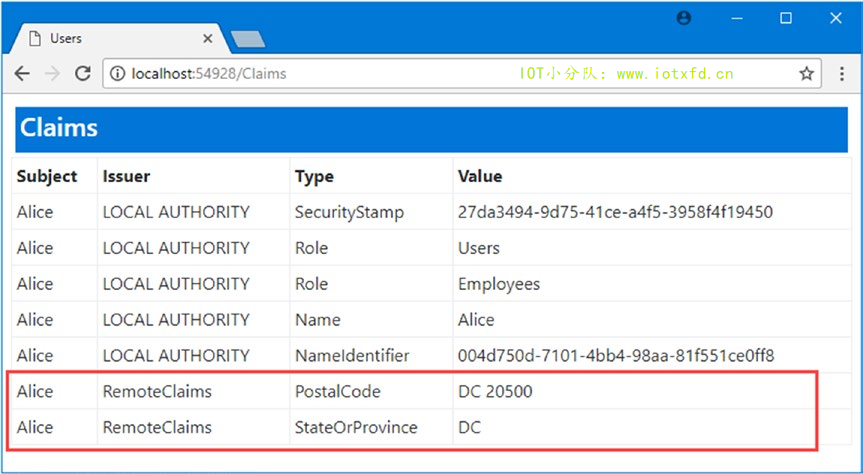
为了了解为什么我创建了一个使用 claims 的控制器,而没有真正解释它们是什么,启动应用程序并以用户 Alice 进行身份验证(使用电子邮件地址 alice@example.com 和密码 secret123)。通过身份验证后,请求 /Claims URL 查看与用户关联的声明,如图30-4所示。
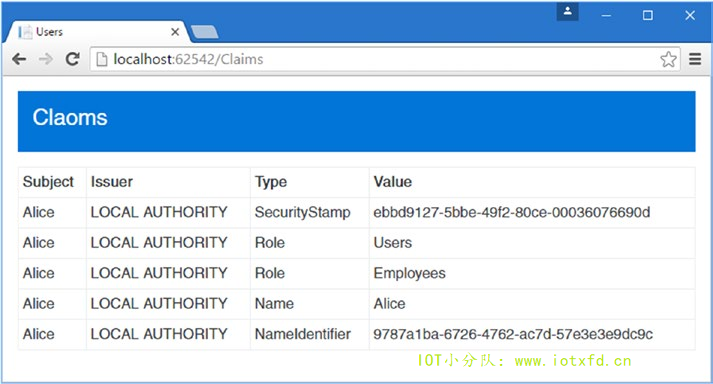
图中的细节很难辨认,所以我在表30-6中转载了内容。
表 30-6:图30-4显示的数据
| Subject | Issuer | Type | Value |
|---|---|---|---|
| Alice | LOCAL AUTHORITY | SecurityStamp | Unique ID |
| Alice | LOCAL AUTHORITY | Role | Users |
| Alice | LOCAL AUTHORITY | Role | Employees |
| Alice | LOCAL AUTHORITY | Name | Alice |
| Alice | LOCAL AUTHORITY | NameIdentifier | Alice 的用户 ID |
该表显示了 claims 的最重要方面,即在实现第29章中的传统身份验证和授权功能时,我还使用了 claims。您可以看到,其中一些 claims 与用户 identity 有关(Name claim 是 Alice,而NameIdentifier claim 是 ASP.NET Core Identity 数据库中 Alice 的唯一用户 ID)。其他 claim 显示角色的成员身份 —— 表中有两个角色声明,反映了 Alice 同时被分配给 Users 和 Employees 角色的事实。
将此信息表示为一组 claims 的不同之处在于,您可以确定数据来自何处。表中显示的所有 cliaims 的Issuer属性被设置为LOCAL AUTHORITY,这表明应用程序已经建立了用户的 identity。
因此,现在您已经看到了一些 claims 示例,我可以更容易地描述 claims 是什么:claims 是应用程序可用的关于用户的任何信息,包括用户的 identity 和角色成员资格。而且,正如您所看到的,我在前几章中定义的关于我的用户的信息会自动由 ASP.NET Core Identity 作为声明提供。虽然 claims 一开始看起来可能令人困惑,但它们并没有魔力,而且就像 MVC 应用程序的其他方面一样,一旦你在幕后窥视它们是如何工作的,它们就变得不那么可怕了。
Claims 很有趣,因为应用程序可以从多个来源获得 claims,而不仅仅是依赖本地数据库获取有关用户的信息。当我在《使用第三方身份验证》一节中向您展示如何通过第三方系统对用户进行身份验证时,您将看到一个真正的例子,但现在我将向示例项目中添加一个类,该类模拟提供 claims 信息的系统。清单30-8显示了我添加到 Infrastructure 文件夹中的 LocationClaimsProvider.cs 文件的内容。
清单 30-8:Infrastructure 文件夹下的 LocationClaimsProvider.cs 文件的内容
using System.Security.Claims;
using System.Threading.Tasks;
using Microsoft.AspNetCore.Authentication;

namespace Users.Infrastructure
{
    public class LocationClaimsProvider : IClaimsTransformation
    {
        public Task<ClaimsPrincipal> TransformAsync(ClaimsPrincipal principal)
        {
            if (principal != null && !principal.HasClaim(c =>
                c.Type == ClaimTypes.PostalCode))
            {
                ClaimsIdentity identity = principal.Identity as ClaimsIdentity;
                if (identity != null && identity.IsAuthenticated
                    && identity.Name != null)
                {
                    if (identity.Name.ToLower() == "alice")
                    {
                        identity.AddClaims(new Claim[] {
                                CreateClaim(ClaimTypes.PostalCode, "DC 20500"),
                                CreateClaim(ClaimTypes.StateOrProvince, "DC")
                            });
                    }
                    else
                    {
                        identity.AddClaims(new Claim[] {
                                CreateClaim(ClaimTypes.PostalCode, "NY 10036"),
                                CreateClaim(ClaimTypes.StateOrProvince, "NY")
                            });
                    }
                }
            }
            return Task.FromResult(principal);
        }

        private static Claim CreateClaim(string type, string value) =>
            new Claim(type, value, ClaimValueTypes.String, "RemoteClaims");
    }
}
TransformAsync方法由IClaimsTransformation接口定义,它接收一个ClaimsPrincipal并检查它,将其Identity属性的值转换为一个ClaimsIdentity对象。然后,Name属性的值用于创建有关用户邮政编码和状态的 claims。
这个类模拟一个系统,例如中央人力资源数据库,它将是有关工作人员的位置信息的权威来源。为了注册 claims 的源,我在Startup类的ConfigureServices方法中定义了一个服务,如清单30-9所示。
清单 30-9:Users 文件夹下的 Startup.cs 文件,启用 Claims 转换
using Microsoft.AspNetCore.Builder;
using Microsoft.AspNetCore.Hosting;
using Microsoft.AspNetCore.Http;
using Microsoft.Extensions.DependencyInjection;
using Microsoft.Extensions.Configuration;
using Microsoft.AspNetCore.Identity;
using Microsoft.EntityFrameworkCore;
using Users.Models;
using Users.Infrastructure;
using Microsoft.AspNetCore.Authentication;

namespace Users
{
    public class Startup
    {
        public Startup(IConfiguration configuration) =>
            Configuration = configuration;

        public IConfiguration Configuration { get; }

        public void ConfigureServices(IServiceCollection services)
        {
            services.AddTransient<IPasswordValidator<AppUser>,
                CustomPasswordValidator>();
            services.AddTransient<IUserValidator<AppUser>,
                CustomUserValidator>();
            services.AddSingleton<IClaimsTransformation,
                LocationClaimsProvider>();

            services.AddDbContext<AppIdentityDbContext>(options =>
                options.UseSqlServer(
                    Configuration["Data:SportStoreIdentity:ConnectionString"]));

            services.AddIdentity<AppUser, IdentityRole>(opts => {
                opts.User.RequireUniqueEmail = true;
                //opts.User.AllowedUserNameCharacters = "abcdefghijklmnopqrstuvwxyz";
                opts.Password.RequiredLength = 6;
                opts.Password.RequireNonAlphanumeric = false;
                opts.Password.RequireLowercase = false;
                opts.Password.RequireUppercase = false;
                opts.Password.RequireDigit = false;
            }).AddEntityFrameworkStores<AppIdentityDbContext>()
                .AddDefaultTokenProviders();

            services.AddMvc();
        }

        public void Configure(IApplicationBuilder app, IHostingEnvironment env)
        {
            app.UseStatusCodePages();
            app.UseDeveloperExceptionPage();
            app.UseStaticFiles();
            app.UseAuthentication();
            app.UseMvcWithDefaultRoute();
        }
    }
}
每次收到请求时,claims 转换中间件都会调用LocationClaimsProvider.TransformAsync方法,该方法模拟我的 HR 数据源并创建自定义声明。您可以通过启动应用程序、作为用户进行身份验证和请求 /Claims URL 来查看自定义 claims 的效果。图30-5显示了 Alice 的 claims。你可能必须退出,并再次登录,以看到变化。
从多个位置获取 claims 意味着应用程序不必重复其他地方保存的数据,并允许集成来自外部各方的数据。Claim.Issuer属性告诉您 claims 来自何处,这有助于您判断数据可能有多准确,以及您应该在应用程序中赋予数据多大的权重。例如,从中央 HR 数据库获得的位置数据可能比从外部邮件列表提供商获得的数据更准确和可靠。
创建自定义 Identity Claims
如果要向应用程序添加自定义本地 claims,则在创建新用户时可以这样做。
UserManager<T>类提供了AddClaim方法和AddClaimsAsync方法用于定义本地 claims,然后将它们存储在数据库中,并在用户通过身份验证时自动检索(这意味着您不需要依赖于 claims 转换特性)。但是,在使用这些方法之前,请考虑如何保持当前存储的数据,以及从应用程序源动态检索数据是否会更好地为应用程序服务。正如我在下一节中解释的那样,claims 是用来进行授权检查的,陈旧的 claims 数据可以允许用户访问本应禁止他们进入的部分应用程序,并阻止他们访问已被授予的区域。
一旦您需要处理一些 claims,就可以使用它们来管理用户对应用程序的访问,而不是使用标准角色。角色的问题在于它们是静态的,一旦用户被分配给角色,用户就一直是成员,直到显式删除为止。例如,这就是大公司的长期雇员最终能以难以置信的方式进入内部系统:他们被分配给他们获得的每一份新工作所需的角色,但是旧的角色很少被删除。
Claims 用于构建授权策略,这些策略是应用程序配置的一部分,并使用授权属性应用于 action 方法或控制器。清单30-10显示了一个简单的策略,它只允许访问具有特定声明类型和值的用户。
清单 30-10:Users 文件夹下的 Startup.cs 文件,创建 Claim 策略
using Microsoft.AspNetCore.Builder;
using Microsoft.AspNetCore.Hosting;
using Microsoft.AspNetCore.Http;
using Microsoft.Extensions.DependencyInjection;
using Microsoft.Extensions.Configuration;
using Microsoft.AspNetCore.Identity;
using Microsoft.EntityFrameworkCore;
using Users.Models;
using Users.Infrastructure;
using Microsoft.AspNetCore.Authentication;
using System.Security.Claims;

namespace Users
{
    public class Startup
    {
        public Startup(IConfiguration configuration) =>
            Configuration = configuration;

        public IConfiguration Configuration { get; }

        public void ConfigureServices(IServiceCollection services)
        {
            services.AddTransient<IPasswordValidator<AppUser>,
                CustomPasswordValidator>();
            services.AddTransient<IUserValidator<AppUser>,
                CustomUserValidator>();
            services.AddSingleton<IClaimsTransformation,
                LocationClaimsProvider>();

            services.AddAuthorization(opts => {
                opts.AddPolicy("DCUsers", policy => {
                    policy.RequireRole("Users");
                    policy.RequireClaim(ClaimTypes.StateOrProvince, "DC");
                });
            });

            services.AddDbContext<AppIdentityDbContext>(options =>
                options.UseSqlServer(
                    Configuration["Data:SportStoreIdentity:ConnectionString"]));

            services.AddIdentity<AppUser, IdentityRole>(opts => {
                opts.User.RequireUniqueEmail = true;
                //opts.User.AllowedUserNameCharacters = "abcdefghijklmnopqrstuvwxyz";
                opts.Password.RequiredLength = 6;
                opts.Password.RequireNonAlphanumeric = false;
                opts.Password.RequireLowercase = false;
                opts.Password.RequireUppercase = false;
                opts.Password.RequireDigit = false;
            }).AddEntityFrameworkStores<AppIdentityDbContext>()
                .AddDefaultTokenProviders();

            services.AddMvc();
        }

        public void Configure(IApplicationBuilder app, IHostingEnvironment env)
        {
            app.UseStatusCodePages();
            app.UseDeveloperExceptionPage();
            app.UseStaticFiles();
            app.UseAuthentication();
            app.UseMvcWithDefaultRoute();
        }
    }
}
AddAuthorization方法设置授权策略,并提供一个AuthorizationOptions对象,该对象定义表30-7中描述的成员。
表 30-7:AuthorizationOptions 类定义的成员
| 名称 | 描述 |
|---|---|
| DefaultPolicy | 此属性返回默认授权策略,在不使用任何参数的情况下应用Authorize特性时使用该策略。默认情况下,此策略检查用户是否经过身份验证。 |
| AddPolicy(name, expression) | 此方法用于定义新策略,如下文所述。 |
策略是使用AddPolicy方法定义的,AddPolicy方法与一个 lambda 表达式一起工作,该表达式在AuthorizationPolicyBuilder对象上操作,使用表30-8中描述的方法分步骤构建策略。
表 30-8:AuthorizationPolicyBuilder 类定义的选定方法
| 名称 | 描述 |
|---|---|
| RequireAuthenticatedUser() | 此方法要求请求与经过身份验证的用户相关联 |
| RequireUserName(name) | 此方法要求请求与指定的用户相关联 |
| RequireClaim(type) | 此方法要求用户具有指定类型的声明。只有 claim 的存在才会被检查,任何值都将被接受。 |
| RequireClaim(type, values) | 此方法要求用户具有指定类型的 claim,并具有一个值范围之一。值可以用逗号分隔的参数表示,也可以表示IEnumerable<string>。 |
| RequireRole(roles) | 此方法要求用户具有角色的成员资格。多个角色可以指定为逗号分隔的参数,也可以指定为IEnumerable<string>,任意一个角色的成员资格都将满足要求。 |
| AddRequirements(requirement) | 此方法将自定义需求添加到策略中,如《创建自定义策略需求》部分所述。 |
清单30-10中的策略要求用户具有 Users 角色的成员资格,并具有一个值为DC的StateOrProvince cliam。当存在多个需求时,必须满足所有这些要求才能授予授权。
AddPolicy方法的第一个参数是应用时可以引用策略的名称。清单30-10中的策略的名称是 DCUsers,这是用于Authorize特性中的名称,它将策略应用于清单30-11中的 Home 控制器。
清单 30-11:Controllers 文件夹下的 HomeController.cs 文件,应用授权策略
using System.Collections.Generic;
using Microsoft.AspNetCore.Mvc;
using Microsoft.AspNetCore.Authorization;
using Users.Models;
using Microsoft.AspNetCore.Identity;
using System.Threading.Tasks;
using System.ComponentModel.DataAnnotations;

namespace Users.Controllers
{
    public class HomeController : Controller
    {
        private UserManager<AppUser> userManager;
        public HomeController(UserManager<AppUser> userMgr)
        {
            userManager = userMgr;
        }

        [Authorize]
        public IActionResult Index() => View(GetData(nameof(Index)));

        //[Authorize(Roles = "Users")]
        [Authorize(Policy = "DCUsers")]
        public IActionResult OtherAction() => View("Index",
            GetData(nameof(OtherAction)));

        //...其它方法省略...

        private Task<AppUser> CurrentUser =>
            userManager.FindByNameAsync(HttpContext.User.Identity.Name);
    }
}
Policy属性用于指定将用于保护 action 方法的策略的名称。结果是,当请求以OtherAction方法为目标时,将对角色进行组合检查,并声称用户已经执行了。只有 Alice 帐户具有角色成员资格和 claims 的正确组合,您可以通过运行应用程序、使用不同用户进行身份验证和请求 /Home/OtherAction URL 来检查它们。
内置需求检查特定值,这是一个很好的起点,但不允许处理每个授权场景。例如,如果应该禁止对某个 claim 值的访问,那么内置的需求就会变得很棘手,而这些需求并不是为这种检查而设置的。
幸运的是,策略系统可以使用自定义需求(它们是实现IAuthorizationRequirement接口的类)和自定义授权处理程序(这些类是计算给定请求的需求的AuthorizationHandler类的子类)来扩展。为了演示,我在 Infrastructure 文件夹中添加了一个名为 BlockUsersRequirement.cs 的文件,并使用它来定义自定义需求和处理程序,如清单30-12所示。
清单 30-12:Infrastructure 文件夹下的 BlockUsersRequirement.cs 文件的内容
using System;
using System.Linq;
using System.Threading.Tasks;
using Microsoft.AspNetCore.Authorization;

namespace Users.Infrastructure
{
    public class BlockUsersRequirement : IAuthorizationRequirement
    {
        public BlockUsersRequirement(params string[] users)
        {
            BlockedUsers = users;
        }
        public string[] BlockedUsers { get; set; }
    }

    public class BlockUsersHandler : AuthorizationHandler<BlockUsersRequirement>
    {
        protected override Task HandleRequirementAsync(
        AuthorizationHandlerContext context,
        BlockUsersRequirement requirement)
        {
            if (context.User.Identity != null && context.User.Identity.Name != null
                && !requirement.BlockedUsers
                    .Any(user => user.Equals(context.User.Identity.Name,
                        StringComparison.OrdinalIgnoreCase)))
            {
                context.Succeed(requirement);
            }
            else
            {
                context.Fail();
            }
            return Task.CompletedTask;
        }
    }
}
BlockUserRequirement类是需求,用于指定用于创建策略的数据,在本例中,该策略是未被授权的用户的列表。BlockUsersHandler类负责使用需求数据评估授权请求,并从AuthorizationHandler<T>类派生,其中T是需求类的类型。
当授权系统需要检查对资源的访问时,会在处理程序类上调用Handle方法。该方法的参数是AuthorizationHandlerContext对象,它定义了表30-9中描述的成员,以及提供对执行检查所需数据的访问的需求对象。
表 30-9:选定的 AuthorizationHandlerContext 成员
| 名称 | 描述 |
|---|---|
| User | 此属性返回与请求关联的ClaimsPrincipal |
| Succeed(requirement) | 如果请求满足要求,则调用此方法。参数是Handle方法接收到的IAuthorizationRequirement对象。 |
| Fail() | 如果请求不能满足要求,则调用此方法。 |
| Resource | 此属性返回一个对象,该对象用于授权对单个应用程序资源的访问,如《使用策略授权对资源的访问》一节所述。 |
清单30-12中的需求处理程序检查用户的名称,以查看它是否在由BlockUsersRequirement对象提供的禁止列表中,并相应地调用Succeed或Fail方法。应用自定义需求需要两个配置更改,如清单30-13所示。
清单 30-13:Users 文件夹下的 Startup.cs 文件,应用自定义授权要求
using Microsoft.AspNetCore.Builder;
using Microsoft.AspNetCore.Hosting;
using Microsoft.AspNetCore.Http;
using Microsoft.Extensions.DependencyInjection;
using Microsoft.Extensions.Configuration;
using Microsoft.AspNetCore.Identity;
using Microsoft.EntityFrameworkCore;
using Users.Models;
using Users.Infrastructure;
using Microsoft.AspNetCore.Authentication;
using System.Security.Claims;
using Microsoft.AspNetCore.Authorization;

namespace Users
{
    public class Startup
    {
        public Startup(IConfiguration configuration) =>
            Configuration = configuration;

        public IConfiguration Configuration { get; }

        public void ConfigureServices(IServiceCollection services)
        {
            services.AddTransient<IPasswordValidator<AppUser>,
                CustomPasswordValidator>();
            services.AddTransient<IUserValidator<AppUser>,
                CustomUserValidator>();
            services.AddSingleton<IClaimsTransformation, LocationClaimsProvider>();
            services.AddTransient<IAuthorizationHandler, BlockUsersHandler>();

            services.AddAuthorization(opts =>
            {
                opts.AddPolicy("DCUsers", policy =>
                {
                    policy.RequireRole("Users");
                    policy.RequireClaim(ClaimTypes.StateOrProvince, "DC");
                });
                opts.AddPolicy("NotBob", policy => {
                    policy.RequireAuthenticatedUser();
                    policy.AddRequirements(new BlockUsersRequirement("Bob"));
                });
            });

            services.AddDbContext<AppIdentityDbContext>(options =>
                options.UseSqlServer(
                    Configuration["Data:SportStoreIdentity:ConnectionString"]));

            services.AddIdentity<AppUser, IdentityRole>(opts =>
            {
                opts.User.RequireUniqueEmail = true;
                //opts.User.AllowedUserNameCharacters = "abcdefghijklmnopqrstuvwxyz";
                opts.Password.RequiredLength = 6;
                opts.Password.RequireNonAlphanumeric = false;
                opts.Password.RequireLowercase = false;
                opts.Password.RequireUppercase = false;
                opts.Password.RequireDigit = false;
            }).AddEntityFrameworkStores<AppIdentityDbContext>()
                .AddDefaultTokenProviders();

            services.AddMvc();
        }

        public void Configure(IApplicationBuilder app, IHostingEnvironment env)
        {
            app.UseStatusCodePages();
            app.UseDeveloperExceptionPage();
            app.UseStaticFiles();
            app.UseAuthentication();
            app.UseMvcWithDefaultRoute();
        }
    }
}
第一步是将处理程序类注册到服务提供者,作为IAuthorizationHandler接口的实现。第二步是将自定义需求添加到策略中,这是使用AddRequirements方法完成的,如下所示:
...
opts.AddPolicy("NotBob", policy => {
    policy.RequireAuthenticatedUser();
    policy.AddRequirements(new BlockUsersRequirement("Bob"));
});
...
其结果是一个策略,它需要不属于 Bob 的经过身份验证的用户,并且可以通过指定策略名来通过Authorize特性应用,如清单30-14所示。
清单 30-14:HomeController.cs 文件,应用自定义策略
...
//[Authorize(Roles = "Users")]
        [Authorize(Policy = "DCUsers")]
        public IActionResult OtherAction() => View("Index",
            GetData(nameof(OtherAction)));

        [Authorize(Policy = "NotBob")]
        public IActionResult NotBob() => View("Index", GetData(nameof(NotBob)));
...
如果您已通过身份验证为 Bob,将无法访问 /Home/NotBob URL,但所有其他用户帐户都将被授予访问权限。
还可以使用策略来控制对单个资源的访问,这是应用程序使用的任何数据项的通用术语,需要比 action 方法级别上更细粒度的管理。作为演示,我向 Models 文件夹添加了一个名为 ProtectedDocument.cs 的文件,并使用它定义了一个类,该类表示具有某些所有权属性的文档,如清单30-15所示。
清单 30-15:Models 文件夹下的 ProtectedDocument.cs 文件的内容
namespace Users.Models
{
    public class ProtectedDocument
    {
        public string Title { get; set; }
        public string Author { get; set; }
        public string Editor { get; set; }
    }
}
这只是一个真正文档的占位符,关键是每个文档只能由两个人编辑:作者和编辑者。一个真正的文档需要内容和更改跟踪以及许多其他特性,但对于示例来说,这就足够了。我在 Controllers 文件夹中添加了一个名为 DocumentController.cs 的类文件,并使用它创建了如清单30-16所示的控制器。
清单 30-16:Controllers 文件夹下的 DocumentController.cs 文件的内容
using Microsoft.AspNetCore.Authorization;
using Microsoft.AspNetCore.Mvc;
using System.Linq;
using Users.Models;

namespace Users.Controllers
{
    [Authorize]
    public class DocumentController : Controller
    {
        private ProtectedDocument[] docs = new ProtectedDocument[] {
            new ProtectedDocument { Title = "Q3 Budget", Author = "Alice",
                Editor = "Joe"},
            new ProtectedDocument { Title = "Project Plan", Author = "Bob",
                Editor = "Alice"}
        };

        public ViewResult Index() => View(docs);

        public ViewResult Edit(string title)
        {
            return View("Index", docs.FirstOrDefault(d => d.Title == title));
        }
    }
}
控制器维护一组固定的ProtectedDocument对象。ProtectedDocument对象用于Index action(将所有文档传递给View方法)和Edit action,后者根据title参数选择一个文档。这两种 action 方法都使用一个名为 Index.cshtml 的视图。我将其添加到一个名为 Views/Document 的新文件夹中,如清单30-17所示。
清单 30-17:Views/Document 文件夹下的 Index.cshtml 文件的内容
@if (Model is IEnumerable<ProtectedDocument>)
{
    <div class="bg-primary m-1 p-1 text-white">
        <h4>Documents (@User?.Identity?.Name)</h4>
    </div>
    <table class="table table-sm table-bordered">
        <tr><th>Title</th><th>Author</th><th>Editor</th><th></th></tr>
        @foreach (var doc in Model)
        {
            <tr>
                <td>@doc.Title</td>
                <td>@doc.Author</td>
                <td>@doc.Editor</td>
                <td>
                    <a class="btn btn-sm btn-primary" asp-action="Edit"
                       asp-route-title="@doc.Title">
                        Edit
                    </a>
                </td>
            </tr>
        }
    </table>
}
else
{
    <div class="bg-primary m-1 p-1">
        <h4>Editing @Model.Title (@User?.Identity?.Name)</h4>
    </div>
    <div class="m-1 p-1">
        Document editing feature would go here...
    </div>
    <a asp-action="Index" class="btn btn-primary">Done</a>
}
<a asp-action="Logout" asp-controller="Account" class="btn btn-danger">Logout</a>
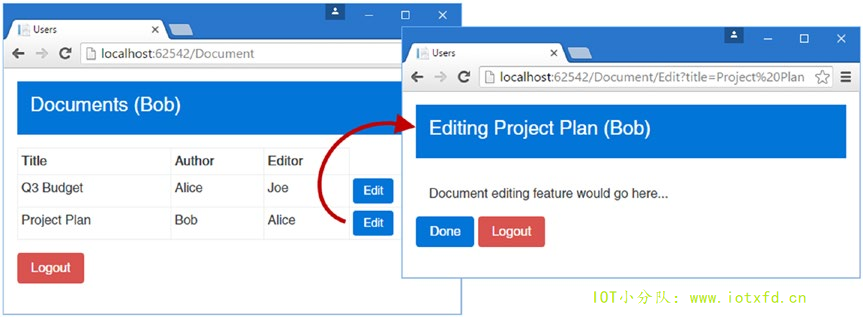
如果视图模型是一系列ProtectedDocument对象,则视图将显示一个表格,每个文档占用一行,显示作者和编辑者的名称,以及到Edit action 的链接。如果视图模型是单个ProtectedDocument,则视图将显示一些占位符内容,用于实际应用程序将提供编辑功能的位置。
目前,唯一的授权限制是应用于DocumentController类的Authorize特性,这意味着任何用户都可以编辑任何文档,而不仅仅是作者和编辑者。您可以通过运行应用程序、请求 /Document URL、作为任何应用程序用户进行身份验证以及单击文档的【Edit】按钮来看到这一点。例如,图30-6显示了用户 Joe 编辑的 Project Plan 文档。
在 action 方法级别限制对单个文档的访问是很困难的,因为在调用 action 方法之前会对Authorize特性进行评估。这意味着在检索和检查ProtectedDocument对象之前,就会做出有关授权的决定,并显示应该允许哪些用户访问文档的详细信息。
这个问题的解决方案是创建一个授权策略和处理程序,一旦用户的详细信息被显示出来,它们知道如何处理ProtectedDocument对象,并在 action 方法中使用它们。为了演示,我在 Infrastructure 文件夹中添加了一个名为 DocumentAuthorization.cs 的文件,并定义了清单30-18中所示的类。
清单 30-18:Infrastructure 文件夹下的 DocumentAuthorization.cs 文件的内容
using System;
using System.Threading.Tasks;
using Microsoft.AspNetCore.Authorization;
using Users.Models;

namespace Users.Infrastructure
{
    public class DocumentAuthorizationRequirement : IAuthorizationRequirement
    {
        public bool AllowAuthors { get; set; }
        public bool AllowEditors { get; set; }
    }

    public class DocumentAuthorizationHandler
        : AuthorizationHandler<DocumentAuthorizationRequirement>
    {
        protected override Task HandleRequirementAsync(
            AuthorizationHandlerContext context,
            DocumentAuthorizationRequirement requirement)
        {
            ProtectedDocument doc = context.Resource as ProtectedDocument;
            string user = context.User.Identity.Name;
            StringComparison compare = StringComparison.OrdinalIgnoreCase;
            if (doc != null && user != null &&
                (requirement.AllowAuthors && doc.Author.Equals(user, compare))
                || (requirement.AllowEditors && doc.Editor.Equals(user, compare)))
            {
                context.Succeed(requirement);
            }
            else
            {
                context.Fail();
            }
            return Task.CompletedTask;
        }
    }
}
AuthorizationHandlerContext对象提供一个Resource属性,该属性提供对可以检查授权的对象的访问。DocumentAuthorizationHandler类检查Resource属性是否是一个ProtectedDocument对象,如果是,则检查当前用户是否是作者和编辑者,以及DocumentAuthorizationRequirement对象是否允许编辑者或作者访问文档。
在清单30-19中,我已经将DocumentAuthorizationHandler类注册为DocumentAuthorizationRequirement所需的处理程序,并定义了具有此需求的策略。
清单 30-19:Users 文件夹下的 Startup.cs 文件,注册处理程序并定义策略
...
public void ConfigureServices(IServiceCollection services)
{
    services.AddTransient<IPasswordValidator<AppUser>,
        CustomPasswordValidator>();
    services.AddTransient<IUserValidator<AppUser>,
        CustomUserValidator>();
    services.AddSingleton<IClaimsTransformation, LocationClaimsProvider>();
    services.AddTransient<IAuthorizationHandler, BlockUsersHandler>();
    services.AddTransient<IAuthorizationHandler, DocumentAuthorizationHandler>();

    services.AddAuthorization(opts =>
    {
        opts.AddPolicy("DCUsers", policy =>
        {
            policy.RequireRole("Users");
            policy.RequireClaim(ClaimTypes.StateOrProvince, "DC");
        });
        opts.AddPolicy("NotBob", policy => {
            policy.RequireAuthenticatedUser();
            policy.AddRequirements(new BlockUsersRequirement("Bob"));
        });
        opts.AddPolicy("AuthorsAndEditors", policy => {
            policy.AddRequirements(new DocumentAuthorizationRequirement
            {
                AllowAuthors = true,
                AllowEditors = true
            });
        });
    });

    services.AddDbContext<AppIdentityDbContext>(options =>
        options.UseSqlServer(
            Configuration["Data:SportStoreIdentity:ConnectionString"]));

    services.AddIdentity<AppUser, IdentityRole>(opts =>
    {
        opts.User.RequireUniqueEmail = true;
        //opts.User.AllowedUserNameCharacters = "abcdefghijklmnopqrstuvwxyz";
        opts.Password.RequiredLength = 6;
        opts.Password.RequireNonAlphanumeric = false;
        opts.Password.RequireLowercase = false;
        opts.Password.RequireUppercase = false;
        opts.Password.RequireDigit = false;
    }).AddEntityFrameworkStores<AppIdentityDbContext>()
        .AddDefaultTokenProviders();

    services.AddMvc();
}
...
最后一步是在 action 方法中应用授权策略,如清单30-20所示。
清单 30-20:Controllers 文件夹下的 DocumentController.cs 文件,应用策略
using Microsoft.AspNetCore.Authorization;
using Microsoft.AspNetCore.Mvc;
using System.Linq;
using Users.Models;
using System.Threading.Tasks;

namespace Users.Controllers
{
    [Authorize]
    public class DocumentController : Controller
    {
        private ProtectedDocument[] docs = new ProtectedDocument[] {
            new ProtectedDocument { Title = "Q3 Budget", Author = "Alice",
                Editor = "Joe"},
            new ProtectedDocument { Title = "Project Plan", Author = "Bob",
                Editor = "Alice"}
        };
        private IAuthorizationService authService;

        public DocumentController(IAuthorizationService auth)
        {
            authService = auth;
        }

        public ViewResult Index() => View(docs);

        public async Task<IActionResult> Edit(string title)
        {
            ProtectedDocument doc = docs.FirstOrDefault(d => d.Title == title);
            AuthorizationResult authorized = await authService.AuthorizeAsync(User,
                doc, "AuthorsAndEditors");
            if (authorized.Succeeded)
            {
                return View("Index", doc);
            }
            else
            {
                return new ChallengeResult();
            }
        }
    }
}
控制器构造函数定义了一个IAuthorizationService参数,该参数提供可用于评估授权策略并使用依赖注入解析的方法。在Edit方法中,我调用AuthorizeAsync方法,传入当前用户、ProtectedDocument对象和要应用的策略的名称。如果AuthorizeAsync方法的结果为true,则批准授权,并调用View方法。如果结果为false,那么就会出现授权问题,我返回一个ChallengeResult对象,正如第17章所描述的,它告诉 MVC 授权失败了。
您可以通过运行应用程序和请求 /Document URL(通过不同用户身份验证)来看到效果。例如,如果身份为 Joe,则可以编辑预算文档,但不能编辑项目计划。
基于 claims 的系统(如 ASP.NET Core Identity)的好处之一是,任何声明都可以来自外部系统,甚至可以标识应用程序的用户。这意味着其他系统可以代表应用程序对用户进行身份验证,ASP.NET Core Identity 基于这一思想,使通过第三方(如 Microsoft、Google、Facebook 和 Twitter)添加对用户身份验证的支持变得简单和容易。
使用第三方身份验证有一些实质性的好处:许多用户已经拥有了一个帐户,用户可以选择使用双因素身份验证,并且您不必在应用程序中管理用户凭据。在接下来的部分中,我将向您展示如何为 Google 用户设置和使用第三方身份验证。
第三方身份验证服务通常需要在对用户进行身份验证之前注册应用程序。注册过程的结果是对第三方服务的身份验证请求中包含的凭据。Google 注册过程在 http://console.developers.google.com 执行,遵循 http://developers.google.com/identity/sign-in/web/devconsole-project 中的说明。您必须指定回调URL,默认配置是 /signin-google。如果您正在开发中,请将回调 URL 设置为 http://localhost:port/signin-google。对于生产应用程序,创建一个包含公共主机名和端口的 URL。
在注册过程之后,您将收到一个客户端 ID(它将您的应用程序标识为 Google)和一个客户端机密(作为安全防范措施,以防止其他应用程序冒充您的应用程序)。
注意:您必须注册自己的应用程序,并使用注册过程生成的客户端 ID 和客户端机密。除非您用应用程序特有的值更改凭据,否则本节中的代码将无法工作。
ASP.NET Core Identity 提供内置支持,通过用户的 Microsoft、Google、Facebook 和 Twitter 帐户对用户进行身份验证,以及对任何支持 OAuth 的身份验证服务提供更普遍的支持。每个服务都有自己的扩展方法,用于在Startup类中向应用程序注册,清单30-21显示了如何设置 Google 服务(为了简洁起见,我从前面的示例中删除了 configuration 语句)。
清单 30-21:Users 文件夹下的 Startup.cs 文件,启用 Google 身份验证
...
public void ConfigureServices(IServiceCollection services)
{
    services.AddTransient<IPasswordValidator<AppUser>,
        CustomPasswordValidator>();
    services.AddTransient<IUserValidator<AppUser>,
        CustomUserValidator>();
    services.AddSingleton<IClaimsTransformation, LocationClaimsProvider>();
    services.AddTransient<IAuthorizationHandler, BlockUsersHandler>();
    services.AddTransient<IAuthorizationHandler, DocumentAuthorizationHandler>();

    services.AddAuthorization(opts =>
    {
        opts.AddPolicy("DCUsers", policy =>
        {
            policy.RequireRole("Users");
            policy.RequireClaim(ClaimTypes.StateOrProvince, "DC");
        });
        opts.AddPolicy("NotBob", policy => {
            policy.RequireAuthenticatedUser();
            policy.AddRequirements(new BlockUsersRequirement("Bob"));
        });
        opts.AddPolicy("AuthorsAndEditors", policy => {
            policy.AddRequirements(new DocumentAuthorizationRequirement
            {
                AllowAuthors = true,
                AllowEditors = true
            });
        });
    });

    services.AddAuthentication().AddGoogle(opts => {
        opts.ClientId = "<enter client id here>";
        opts.ClientSecret = "<enter client secret here>";
    });

    services.AddDbContext<AppIdentityDbContext>(options =>
        options.UseSqlServer(
            Configuration["Data:SportStoreIdentity:ConnectionString"]));

    services.AddIdentity<AppUser, IdentityRole>(opts =>
    {
        opts.User.RequireUniqueEmail = true;
        opts.Password.RequiredLength = 6;
        opts.Password.RequireNonAlphanumeric = false;
        opts.Password.RequireLowercase = false;
        opts.Password.RequireUppercase = false;
        opts.Password.RequireDigit = false;
    }).AddEntityFrameworkStores<AppIdentityDbContext>()
        .AddDefaultTokenProviders();

    services.AddMvc();
}
...
AddAuthentication.AddGoogle方法设置使用 Google 对用户进行身份验证所需的服务,并指定在注册过程中创建的客户端 ID 和客户端机密。
当您使用第三方对用户进行身份验证时,您可以选择在 Identity 数据库中创建一个用户,然后可以使用该用户来管理角色和 claims,就像对常规用户一样。在第28章中,我添加了一个用户验证类,如果他们的电子邮件地址不在 example.com 域中,就不能创建他们。由于我将处理来自任意域和所有域的用户,因此必须在本例的验证器中禁用电子邮件检查,如清单30-22所示。
清单 30-22:Infrastructure 文件夹下的 CustomUserValidator.cs 文件,禁用验证
using System.Collections.Generic;
using System.Linq;
using System.Threading.Tasks;
using Microsoft.AspNetCore.Identity;
using Users.Models;

namespace Users.Infrastructure
{
    public class CustomUserValidator : UserValidator<AppUser>
    {
        public override async Task<IdentityResult> ValidateAsync(
            UserManager<AppUser> manager,
            AppUser user)
        {
            IdentityResult result = await base.ValidateAsync(manager, user);

            List<IdentityError> errors = result.Succeeded ?
                new List<IdentityError>() : result.Errors.ToList();

            //if (!user.Email.ToLower().EndsWith("@example.com"))
            //{
            //    errors.Add(new IdentityError
            //    {
            //        Code = "EmailDomainError",
            //        Description = "Only example.com email addresses are allowed"
            //    });
            //}

            return errors.Count == 0 ? IdentityResult.Success
                : IdentityResult.Failed(errors.ToArray());
        }
    }
}
接下来,我在 Views/Account/Login.cshtml 文件中添加了一个按钮,它允许用户通过 Google 登录,如清单30-23所示。Google 为按钮提供图像,使其与其他支持 Google 帐户的应用程序保持一致,但为了简单起见,我刚刚创建了一个标准按钮。
清单 30-23:Views/Account 文件夹下的 Login.cshtml 文件,添加一个按钮
@model LoginModel

<div class="bg-primary m-1 p-1 text-white"><h4>Log In</h4></div>

<div class="text-danger" asp-validation-summary="All"></div>

<form asp-action="Login" method="post">
    <input type="hidden" name="returnUrl" value="@ViewBag.returnUrl" />
    <div class="form-group">
        <label asp-for="Email"></label>
        <input asp-for="Email" class="form-control" />
    </div>
    <div class="form-group">
        <label asp-for="Password"></label>
        <input asp-for="Password" class="form-control" />
    </div>
    <button class="btn btn-primary" type="submit">Log In</button>
    <a class="btn btn-info" asp-action="GoogleLogin"
       asp-route-returnUrl="@ViewBag.returnUrl">
        Log In With Google
    </a>
</form>
新按钮的目标是 Account 控制器上的 GoogleLogin action。您可以在清单30-24中看到此方法以及我对控制器所做的其他更改。
清单 30-24:Controllers 文件夹下的 AccountController.cs 文件,添加对 Google 的支持
using System.Threading.Tasks;
using Microsoft.AspNetCore.Authorization;
using Microsoft.AspNetCore.Mvc;
using Users.Models;
using Microsoft.AspNetCore.Identity;
using System.Security.Claims;
using Microsoft.AspNetCore.Http.Authentication;

namespace Users.Controllers
{
    [Authorize]
    public class AccountController : Controller
    {
        private UserManager<AppUser> userManager;
        private SignInManager<AppUser> signInManager;

        //...其它方法省略...

        [AllowAnonymous]
        public IActionResult GoogleLogin(string returnUrl)
        {
            string redirectUrl = Url.Action("GoogleResponse", "Account",
                new { ReturnUrl = returnUrl });
            var properties = signInManager
                .ConfigureExternalAuthenticationProperties("Google", redirectUrl);
            return new ChallengeResult("Google", properties);
        }
        [AllowAnonymous]
        public async Task<IActionResult> GoogleResponse(string returnUrl = "/")
        {
            ExternalLoginInfo info = await signInManager.GetExternalLoginInfoAsync();
            if (info == null)
            {
                return RedirectToAction(nameof(Login));
            }
            var result = await signInManager.ExternalLoginSignInAsync(
                info.LoginProvider, info.ProviderKey, false);
            if (result.Succeeded)
            {
                return Redirect(returnUrl);
            }
            else
            {
                AppUser user = new AppUser
                {
                    Email = info.Principal.FindFirst(ClaimTypes.Email).Value,
                    UserName =
                        info.Principal.FindFirst(ClaimTypes.Email).Value
                };
                IdentityResult identResult = await userManager.CreateAsync(user);
                if (identResult.Succeeded)
                {
                    identResult = await userManager.AddLoginAsync(user, info);
                    if (identResult.Succeeded)
                    {
                        await signInManager.SignInAsync(user, false);
                        return Redirect(returnUrl);
                    }
                }
                return AccessDenied();
            }
        }
    }
}
GoogleLogin方法创建AuthenticationProperties类的实例,并将RedirectUri属性设置为一个 URL,指向同一个控制器中的GoogleResponse action。下一部分是一个神奇的短语,它将用户重定向到 Google 身份验证页面,而不是应用程序定义的错误,从而导致 ASP.NET Core Identity 响应未经授权的错误。
...
return new ChallengeResult("Google", properties);
...
这意味着当用户通过【Google】按钮单击登录时,他们的浏览器被重定向到 Google 身份验证服务,然后在经过身份验证后重定向到GoogleResponse action 方法。在GoogleResponse方法中,我通过调用SigninManager的GetExternalLoginInfoAsync获得外部登录的详细信息,如下所示:
...
ExternalLoginInfo info = await signInManager.GetExternalLoginInfoAsync();
...
ExternalLoginInfo类定义了一个ExternalPrincipal属性,该属性返回一个ClaimsPrincipal对象,包含 Google 为用户提供的 claims。我使用ExternalLoginSignInAsync方法在用户中注册应用程序,如下所示:
...
var result = await signInManager.ExternalLoginSignInAsync(
    info.LoginProvider, info.ProviderKey, false);
...
如果登录失败,那是因为数据库中没有代表 Google 用户的用户,我通过创建新用户并使用以下两条语句将 Google 凭据与其关联来解决这个问题:
...
IdentityResult identResult = await userManager.CreateAsync(user);
...
identResult = await userManager.AddLoginAsync(user, info);
...
注意:当我创建身份用户时,使用 Google 提供的电子邮件声明来处理
AppUser对象的UserName属性,这样我就不会与数据库中的任何现有用户产生任何名称冲突。
若要测试身份验证,请启动应用程序,单击【via Google】按钮登录,并为有效的 Google 帐户提供凭据。完成身份验证过程后,浏览器将被重定向回应用程序。
在本章中,我向您展示了 ASP.NET Core Identity 所支持的一些高级特性。我演示了自定义用户属性的使用,以及如何使用数据库迁移来更新数据库架构以支持它们。我解释了 claims 是如何工作的,以及如何使用它们来创建通过策略授权用户的更灵活的方法。我还解释了如何使用策略来控制对应用程序管理的单个资源的访问。在结束本章时,我向您展示了如何通过 Google 对用户进行身份验证,Google 是在使用 claims 背后的想法的基础上建立起来的。在下一章中,我将向您展示 MVC 应用程序中使用的一些最重要的约定是如何实际实现的,以及如何在您自己的应用程序中定制它们。
;